Assetto Corsa EVO - Dedicated Server Setup
To ensure your dedicated server is set up correctly, please follow this guide.
Rule A: Game Traffic
Port Range: 9700 (This is the Default Port ID, You can change this to whatever you prefer)Protocol: Both TCP and UDP
Local IP: Enter your computer’s internal IP address (found via ipconfig as "IPv4 Address").
Rule B: HTTP/API Traffic
Port Range: 8081Protocol: TCP/HTTP
Local IP: Enter the same computer IP used above.
We have provided guides for some internet service providers below and will add more:
EE Guidelines
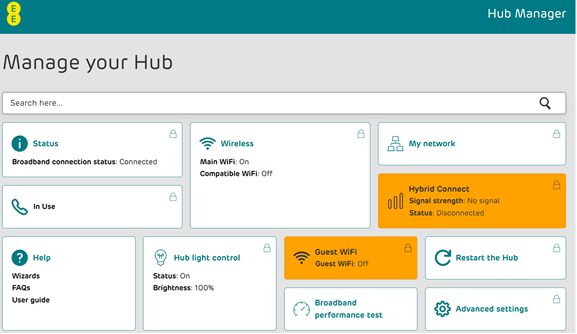
1. Access Your Router Dashboard
Open a Web Browser: Use any standard browser like Chrome, Firefox, or Edge.
Enter IP Address: Type your router’s Gateway IP into the address bar.
Note: Common addresses are 192.168.0.1 or 192.168.1.1. If those don't work, type cmd in your Windows search bar, type ipconfig, and look for the Default Gateway.
Login: Enter your admin credentials. (If you’ve never changed these, they are usually found on a sticker on the physical router).
2. Set Up Port Forwarding Rules
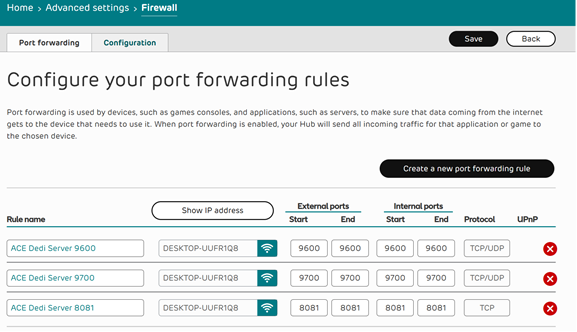
Navigate to the Port Forwarding, NAT, or Virtual Server section (often found under "Advanced Settings" or "Security").
You need to create two specific rules:
Rule A: Game Traffic
Port Range: 9700 [cite: 11] (This is the Default Port ID; you can change this to whatever you prefer).
Protocol: Both TCP and UDP
Local IP: Enter your computer’s internal IP address (found via ipconfig as "IPv4 Address").
Rule B: HTTP/API Traffic
Port Range: 8081
Protocol: TCP/HTTP
Local IP: Enter the same computer IP used above.
3. Commit Changes
Click Save, Apply, or Add Rule.
BT Guidelines
1. Access Your Router Dashboard
Open a Web Browser: Use any standard browser like Chrome, Firefox, or Edge.
Enter IP Address: Type your router’s Gateway IP into the address bar.
Note: Common addresses are 192.168.0.1 or 192.168.1.1. If those don't work, type cmd in Windows search, type ipconfig, and look for the Default Gateway.
Login: Enter admin credentials found on the router sticker.
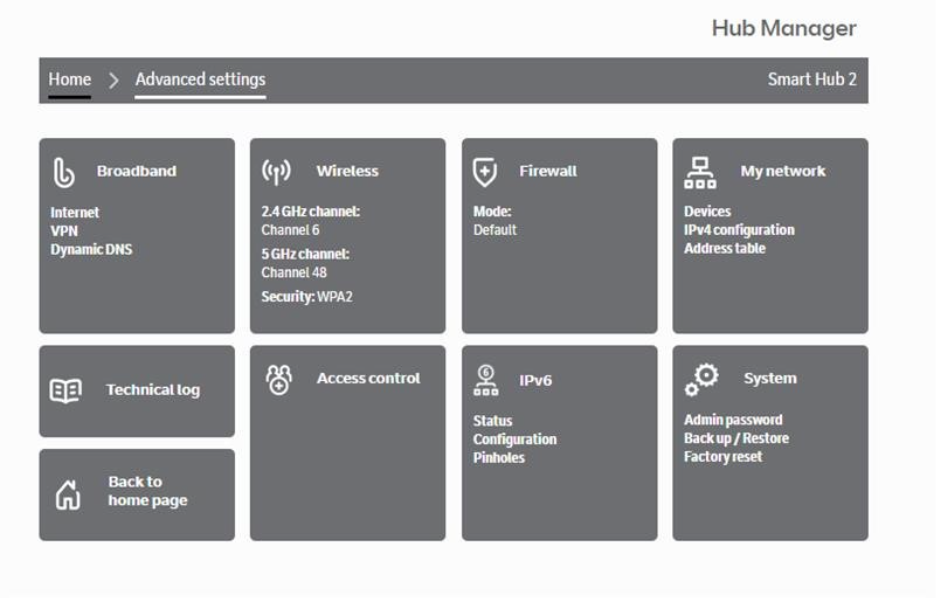
Network Settings: Click on "My network" and navigate to "IPv4 Configuration".
2. Set Up Port Forwarding Rules
Navigate to Port Forwarding, NAT, or Virtual Server (usually under "Advanced Settings" or "Security").
Create these two rules:
Rule A: Game Traffic
Port Range: 9700.
Protocol: Both TCP and UDP.
Local IP: Your computer's internal IPv4 address.
Rule B: HTTP/API Traffic
Port Range: 8081.
Protocol: TCP/HTTP.
Local IP: Same internal IP used above.
3. Commit Changes
Click Save, Apply, or Add Rule.
Virgin Media Guidelines
1. Access Your Router Dashboard
Open a Web Browser: Use any standard browser like Chrome, Firefox, or Edge.
Enter IP Address: Type your router’s Gateway IP into the address bar.
Note: Common addresses are 192.168.0.1 or 192.168.1.1. If those don't work, type cmd in your Windows search bar, type ipconfig, and look for the Default Gateway.
Login: Enter your admin credentials (usually found on a sticker on the physical router).
2. Set Up Port Forwarding Rules
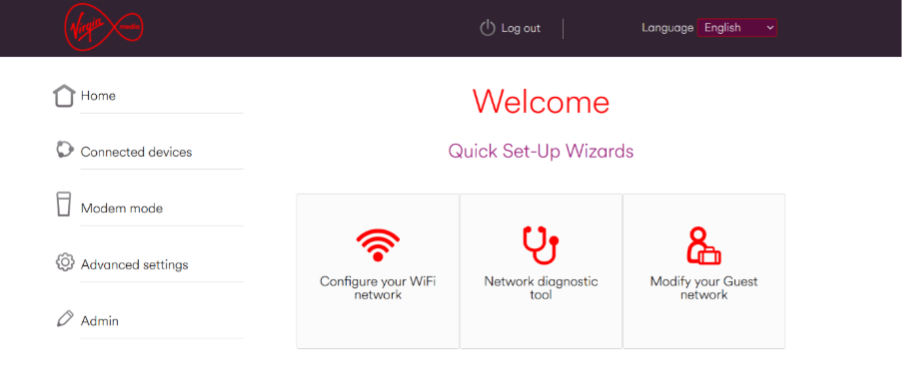
Navigate to Port Forwarding (found under "Advanced Settings").
You need to create two specific rules:
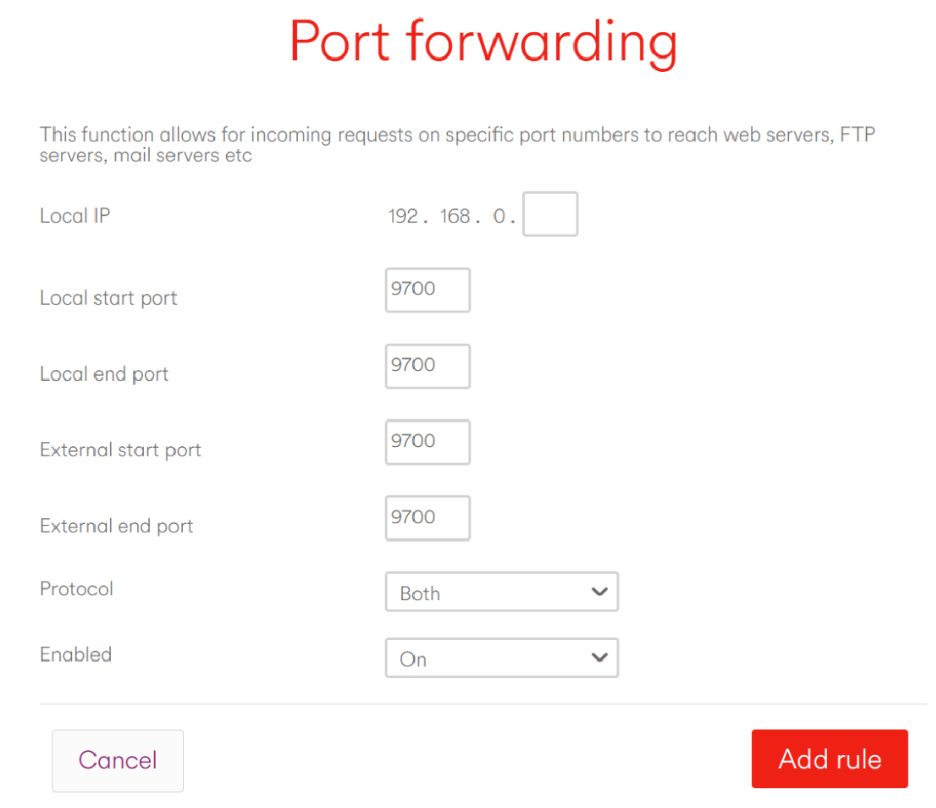
Rule A: Game Traffic
Port Range: 9700 (Default Port ID; you can change this to whatever you prefer).
Protocol: Both TCP and UDP.
Local IP: Enter your computer’s internal IP address (found via ipconfig as "IPv4 Address").
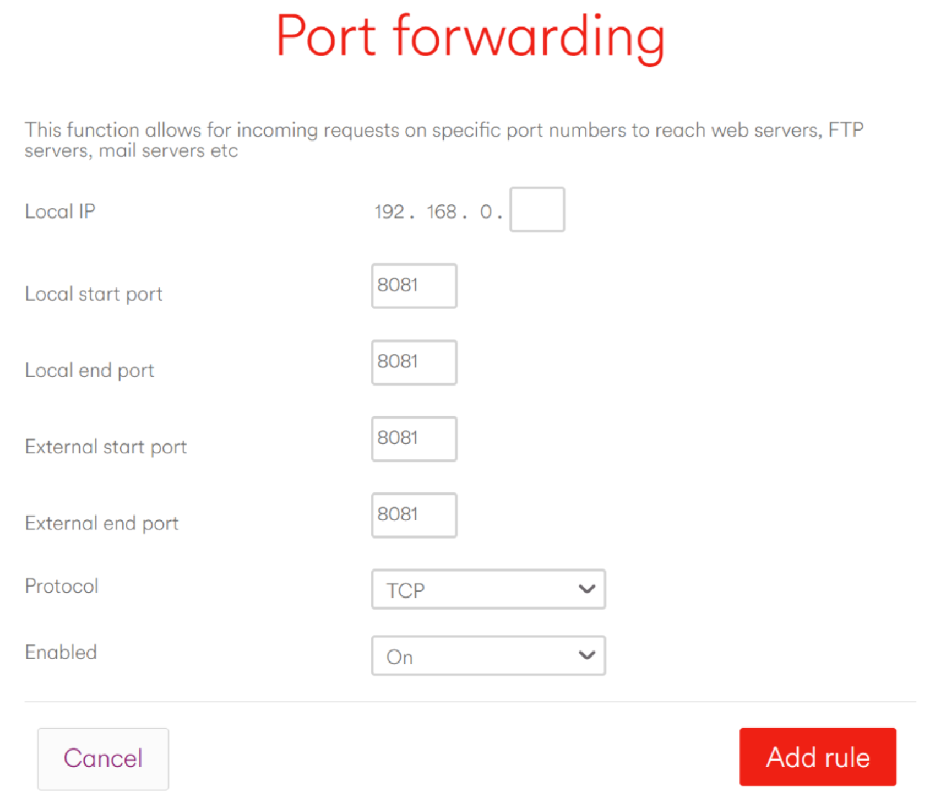
Rule B: HTTP/API Traffic
Port Range: 8081.
Protocol: TCP/HTTP.
Local IP: Enter the same computer IP used above.
3. Commit Changes
Click Save, Apply, or Add Rule.
TalkTalk Guidelines (Eero App)
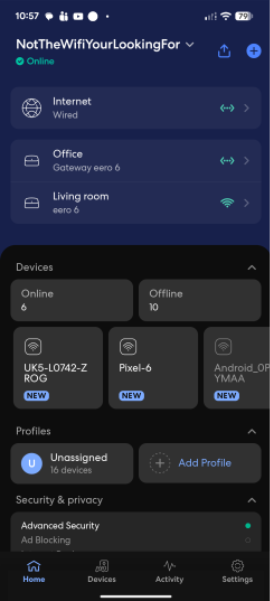
1. Access Your Router Dashboard
Download the Eero App: Install the app on your mobile device.
Sign In: Log in with your TalkTalk/Eero account credentials.
2. Set Up Port Forwarding Rules
Navigate to the Port Forwarding section. You can find this by following: "Settings" > "Advanced Settings" > "Networking" > "Reservation & Port Forwarding".
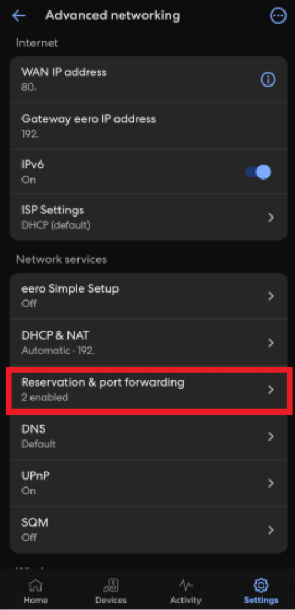
Initial Step: Add a Reservation
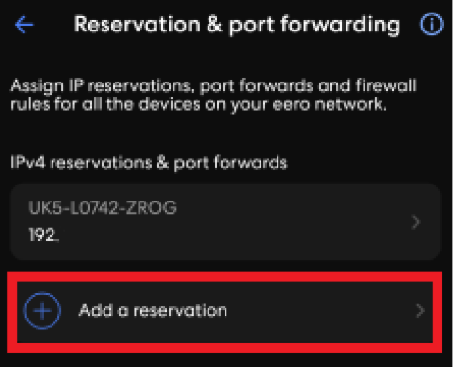
Select the specific device you want to create a reservation for, or manually enter the IP address.
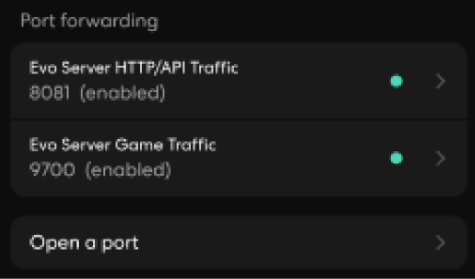
Now, create the following two rules:
Rule A: Game Traffic
Port Name: Evo Server Game Traffic.
Port Range: 9700 (Default Port ID).
Protocol: Both TCP and UDP.
Rule B: HTTP/API Traffic
Port Name: Evo Server HTTP/API Traffic.
Port Range: 8081.
Protocol: TCP/HTTP.
3. Commit Changes
Click Save to apply your new rules.
AC EVO Server Launcher Setup
Now that the Ports are open, you need to configure the actual game server software.
Step 1: Download the “Assetto Corsa Dedicated Server Tool”
Open Steam and navigate to your Library.
Ensure "Games" and "Tools" are checked in the library dropdown.
Type Assetto Corsa EVO into the search bar.
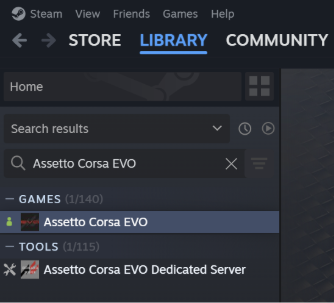
Select Assetto Corsa EVO Dedicated Server and click Install.
Note: You MUST own Assetto Corsa EVO for the Tool to appear in your Steam Library.
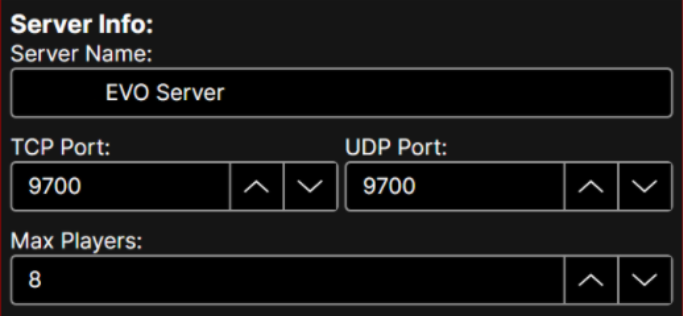
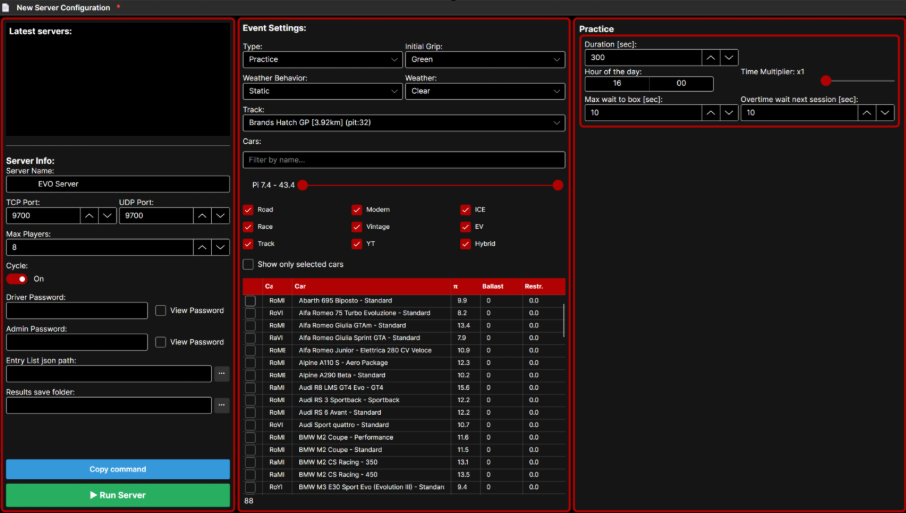
Step 2: Establish Connection Basics
Server Name: Type a recognizable name into the field.
Connection Ports: Ensure the TCP and UDP ports match your router settings (e.g., 9700).
Capacity: Adjust Max Players to fit your hardware and bandwidth.
Security: Set a Driver Password for private races and an Admin Password to manage the server while driving.
Step 3: Define the Environment
Select Track: Use the Track dropdown to pick your circuit.
Surface Grip: Use Initial Grip to set traction levels. "Green" indicates a slippery, fresh track.
Weather: Choose a preset (e.g., Clear). Select Static if you want conditions to remain the same.
Step 4: Curate the Entry List (Cars)
Filter by Category: Use the red checkboxes (Road, Race, Vintage, etc.) to narrow the list.
Performance Index: Adjust the Pi slider to ensure evenly matched cars.
Select Specific Cars: Check the boxes next to the vehicles you want to include.
Balance of Performance (BoP): Add Ballast or Restr. to specific cars to balance their power.
Step 5: Configure Session Rules
Set Duration: Input time in seconds (e.g., 300 = 5 minutes).
Set the Clock: Choose the Hour of the day (e.g., 16:00).
Time Progression: Adjust the Time Multiplier to speed up the day/night cycle
Cleanup: Set Max wait to box to clear "AFK" players.
Step 5: Save and Deploy
Review: Ensure Cycle is "On" if you want the session to loop.
Run Server: Click the green Run Server button.
Monitor: A console window will pop up. Your server is live as long as it doesn't show an "Error".
Going Live & Troubleshooting
Save Profile: Save these settings in the launcher to avoid re-entering them.
Verify: Open AC EVO and search for your server name in the Server Browser.